All files that you delete regularly on Windows are moved to the Recycle Bin first. Designed as a last resort to recover accidentally deleted files, files that sit in the Recycle Bin may sit there for a long period. While that is not a huge problem most of the time, if disk space is scarce, it may be frustrating to empty the Recycle Bin manually regularly.
You could set a custom Recycle Bin size to avoid it occupying too much space on a drive, or, use automation to clear the Windows Recycle Bin regularly.
This guide offers a general solution to the Recycle Bin problem, and a specific solution that is only available on Windows 10 devices.
General Solution for all Windows versions
The following method is compatible with all Windows versions and editions. It requires the creation of a batch file and running that batch file either using a policy or as a startup command.
- Right-click on the desktop or another folder and select New > Text Document.
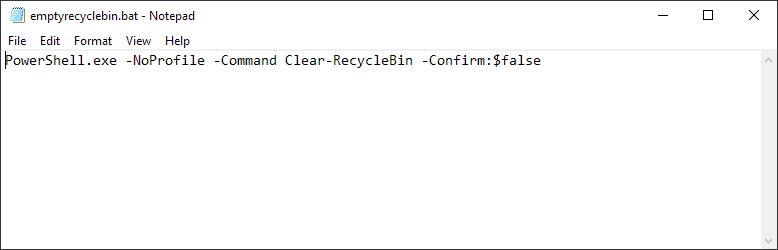
- Paste the following line of code into the document: PowerShell.exe -NoProfile -Command Clear-RecycleBin -Confirm:$false
- Save the document.
- Rename it to emptyrecyclebin.bat. Make sure the file has the .bat extension and not .bat.txt.
- Test the file once to make sure it works.
The next step depends on the Windows edition. If you run professional or Enterprise editions, do the following:
- Open the Start Menu.
- Type gpedit.msc and select the result to load the Group Policy Editor.
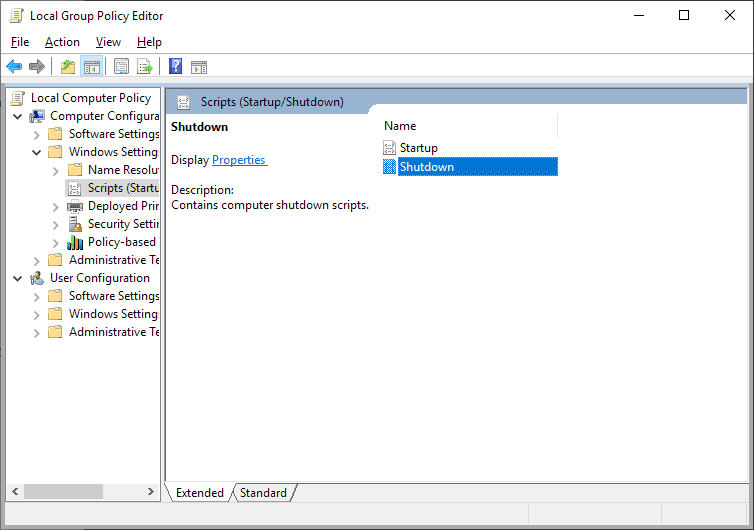
- Go to Computer Configuration > Windows Settings > Scripts > Shutdown
- Double-click on Shutdown to open its Properties.
- Select Add.
- Use the Browse option to pick the emptyrecyclebin.bat that you created previously.
- Select ok.
Windows will execute the script (to delete Recycle Bin content) when Windows shuts down automatically from that moment on.
You can use the same process to delete the script again if you don’t want to use it anymore.
If you run Windows 10 Home, you may execute the script on startup by placing it in the startup folder:
- Open Explorer.
- Type in the address bar shell:startup. This should open the startup folder.
- Drag and drop the script to the folder.
Windows will execute the script on startup automatically from that moment on. You can delete the script again if you don’t want to use it anymore. (via Major Geeks)
Storage Sense on Windows 10

Microsoft’s Windows 10 operating system comes with a new feature called Storage Sense; you may configure it to delete Recycle Bin content, and other temporary files, regularly and automatically.
- Use the shortcut Windows-I to open the Settings application.
- Go to System > Storage.
- Select “Change how we free up space automatically” on the Storage page.
- Toggle Storage sense to “On”.
- Set a desired period for the feature, e.g. every day, week, month, or on low disk space.
- Check “Delete temporary files that my apps aren’t using”.
- Set the desired period that deleted files need to sit in the Recycle Bin untouched before Windows deletes the files. The default period is 30 days, you may change that to 1, 14 or 60 days (or never).
- If you don’t want files in the download folder to be deleted automatically, make sure that setting is set to “never”.
Windows will from that moment on delete files in the Recycle Bin if the time they have been in the recycle bin untouched exceeds the selected period.
Ghacks needs you. You can find out how to support us here or support the site directly by becoming a Patreon. Thank you for being a Ghacks reader. The post How to empty the Windows Recycle Bin automatically appeared first on gHacks Technology News.
Source: https://www.ghacks.net/2019/04/12/how-to-empty-the-windows-recycle-bin-automatically/